Ionic 4 just hit RC2 and I am playing around with a simple Task app for a friend. He wants mobile apps and a website, so a perfect fit for Ionic, since it can be deployed as a static website pretty easily.
Combine that with AWS's recent announcement of S3 deployment support for CodePipeline means we now have a very simple method for building and deploying the PWA side of the Ionic app. I intend to show you how you can get it setup in about 5 minutes**. When all done, the process will look something like this:
 Basically, the CICD for an Ionic PWA
- Developer pushes code to CodeCommit/Github repository
- CodeCommit fires a webhook to CodePipeline
- CodePipeline pulls code from the repository and hands over to CodeBuild
- CodeBuild compiles Ionic into static files for the web and pushes to S3
- CloudFront updates cache from S3
- End users read built files from CloudFront site.
By the end of this blog, you should be able to deploy your own CodeCommit/Github repository to the public web entirely by CICD.
We're going to start with a basic Ionic 4 application. I assume you already have the Ionic cli installed ( npm i -g ionic if not), so let's bootstrap a new project:
$ ionic start myApp tabs --type=angular && cd myApp
You can verify the build for the web app works:
$ ionic build --prod
When done you should now see a bunch of compiled files in the ./www/ directory. These are Ionic's deployable web assets.
Let's make this a process we can easily run with npm. Update your package.json, adding a new "build:prod" to your scripts config:
"scripts": {
  "ng": "ng",
  "start": "ng serve",
  "build": "ng build",
  "test": "ng test",
  "lint": "ng lint",
  "e2e": "ng e2e",
  "build:prod": "ionic build --prod"
}
Now let's add a buildspec.yml file to the root of the project. We're going to point CodeBuild at this later.
version: 0.2

phases:
  pre_build:
    commands:
      - npm i
  build:
    commands:
      - npm run build:prod
artifacts:
  files:
    - '**/*'
  base-directory: www
That's all we need to do to the code, so now push this to your repo, either AWS CodeCommit or Github.
Now login to your AWS CodePipeline Console. We're going to create a new CodePipeline:
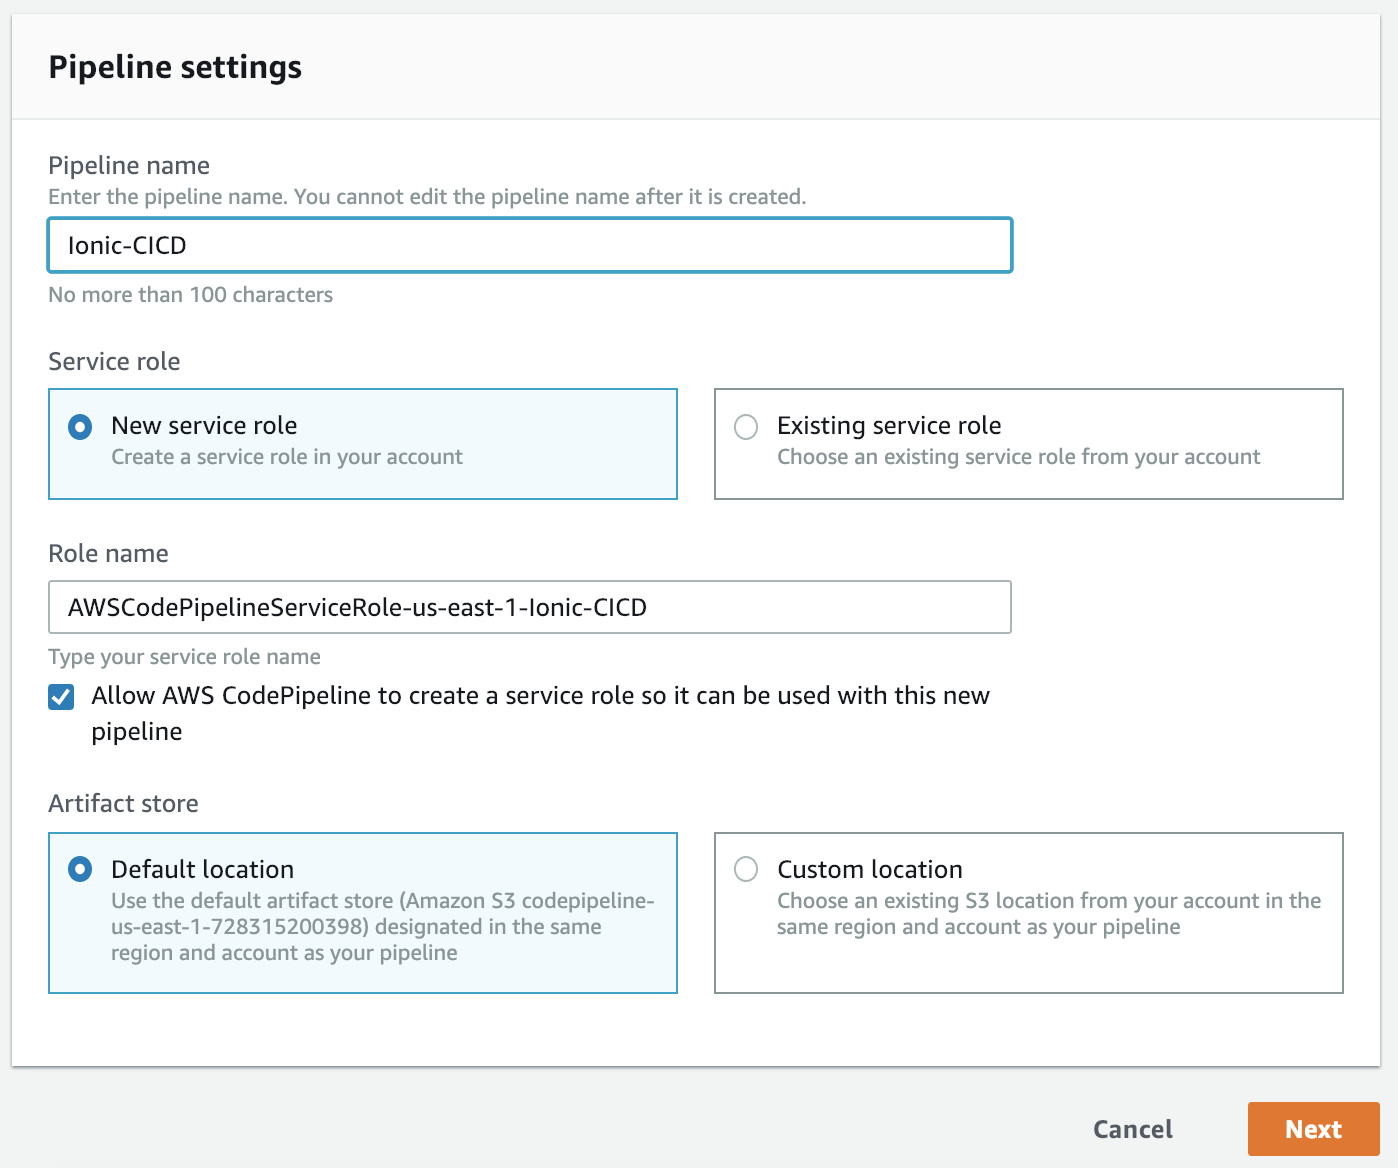 Start creating the CodePipeline
Fill it out similar to above. You can override as you see fit but the defaults should work. Click Next.
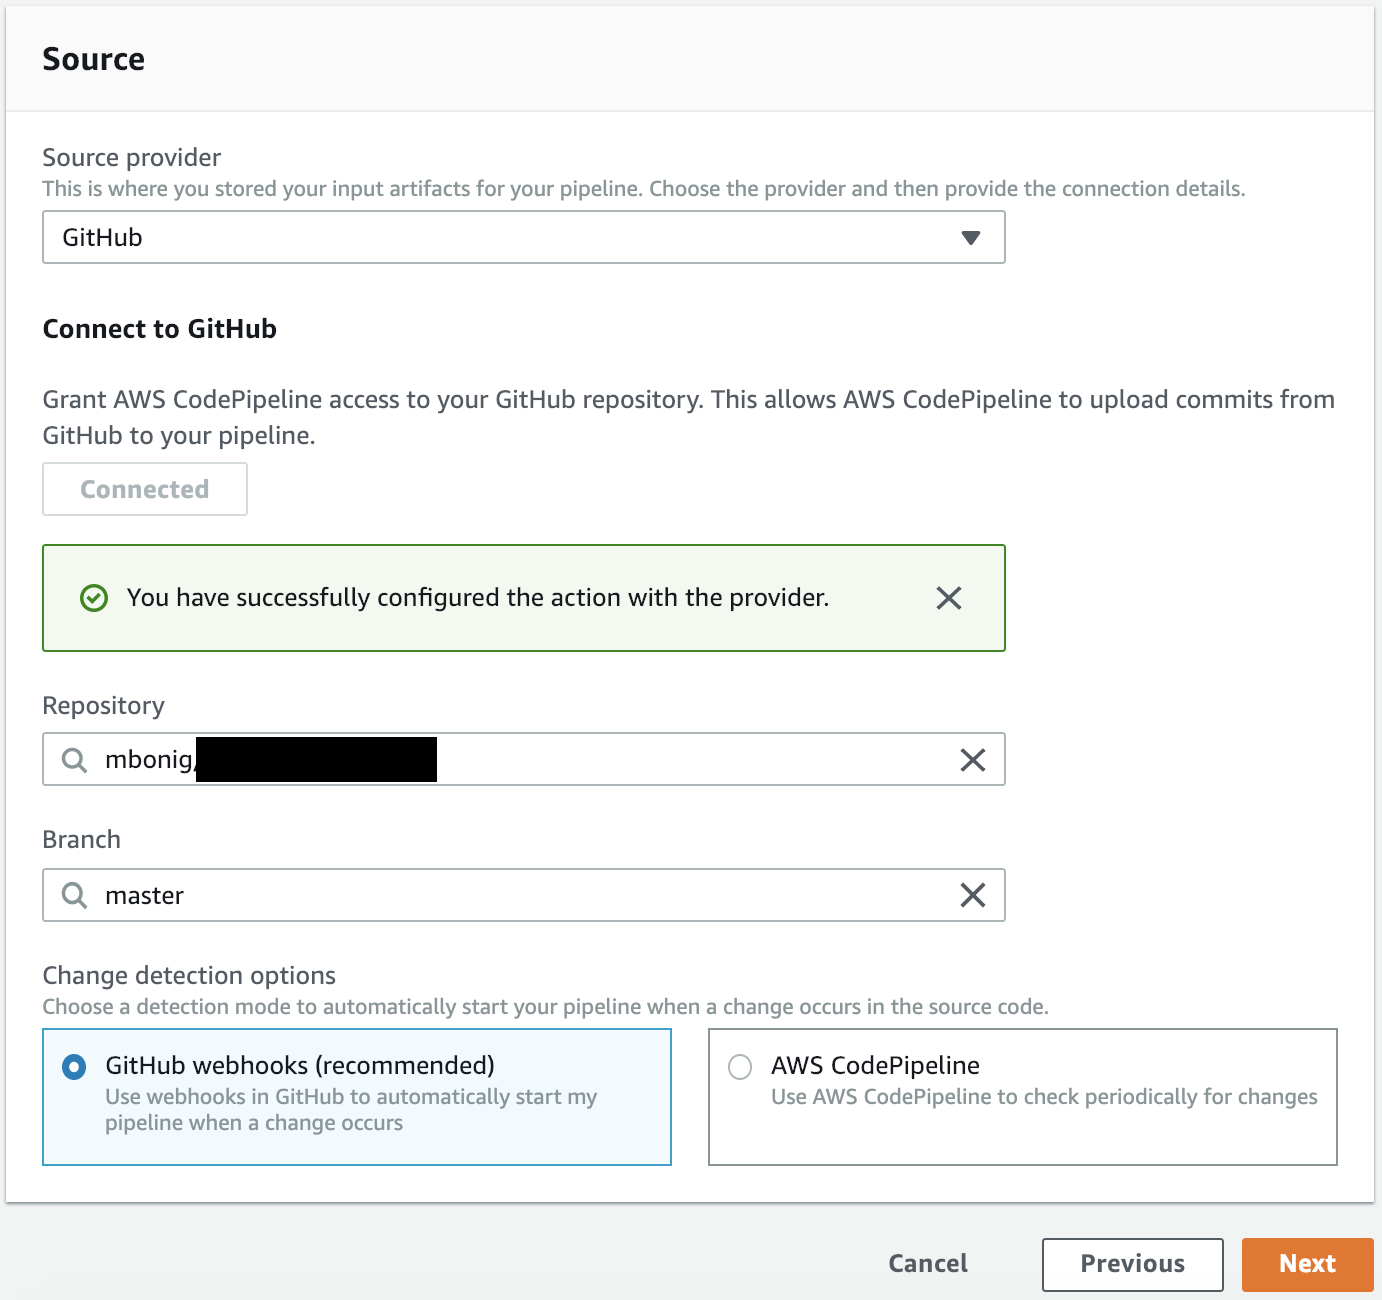 Pick your source
Fill out the source, in this case I'm using a Github repository. Click Next. Now we setup the Build State, the CodeBuild step:
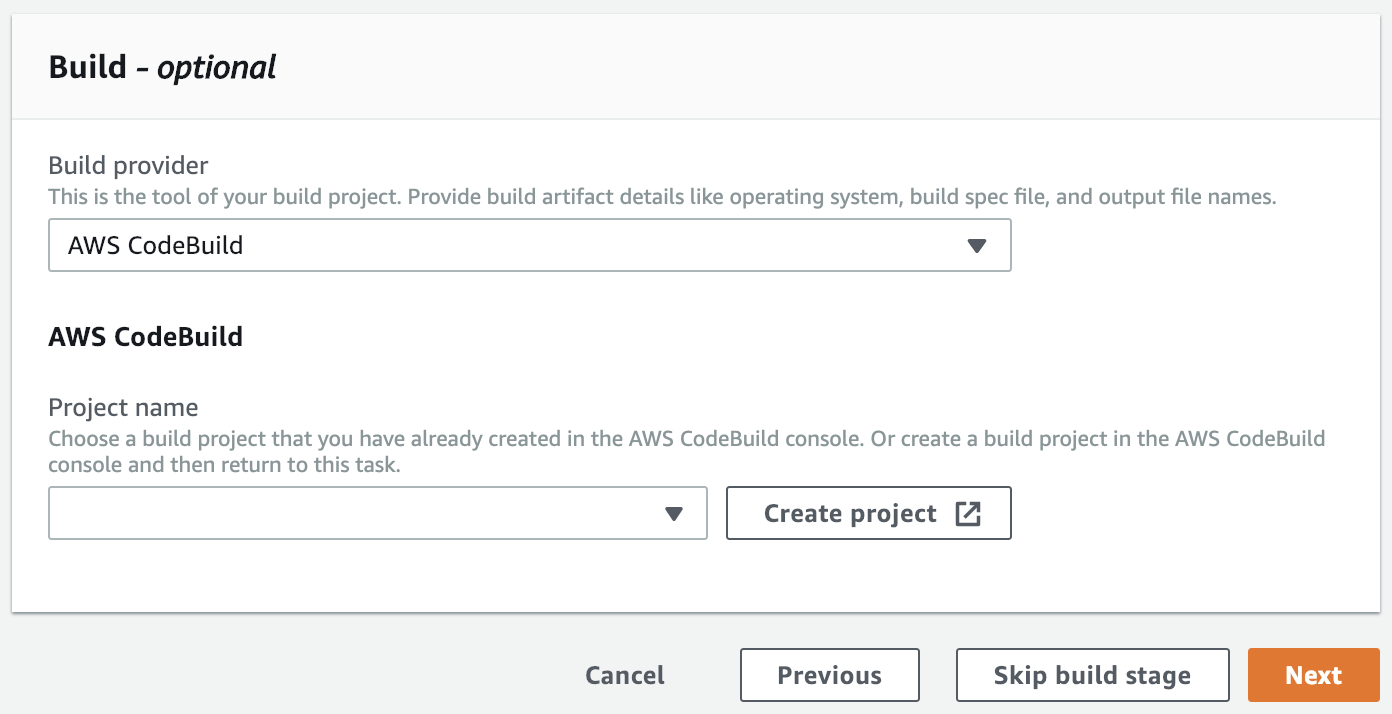 Do the build
Click Create Project. In the new window start to fill out some basic CodeBuild info:
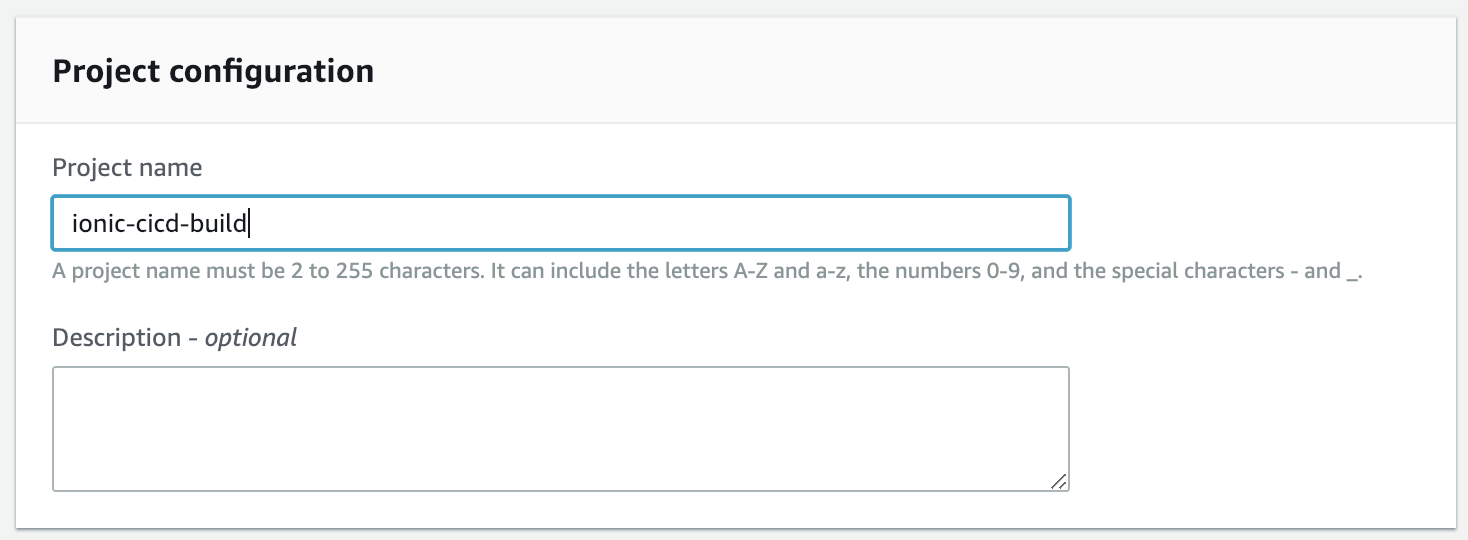 CodeBuild project details
Then fill out the specifics for the build:
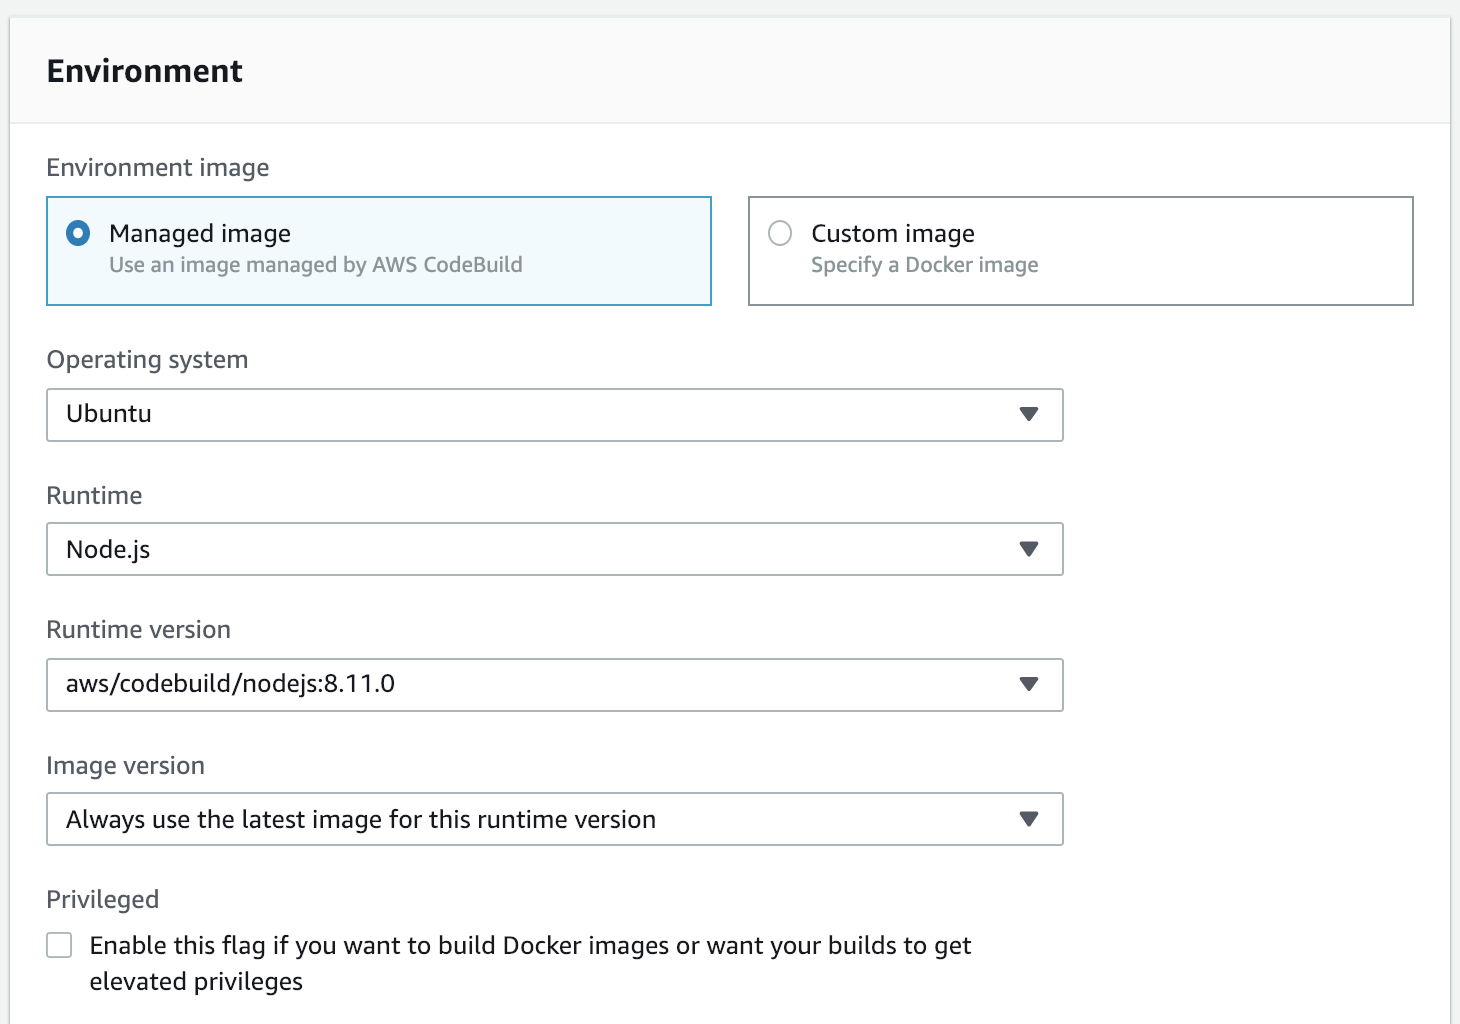 Ionic is Node-based, hence using a Node Runtime. Your mileage may vary.
We'll be using a Node-based container for our build environment. You can leave everything else on the defaults:
 Defaults are good** here.
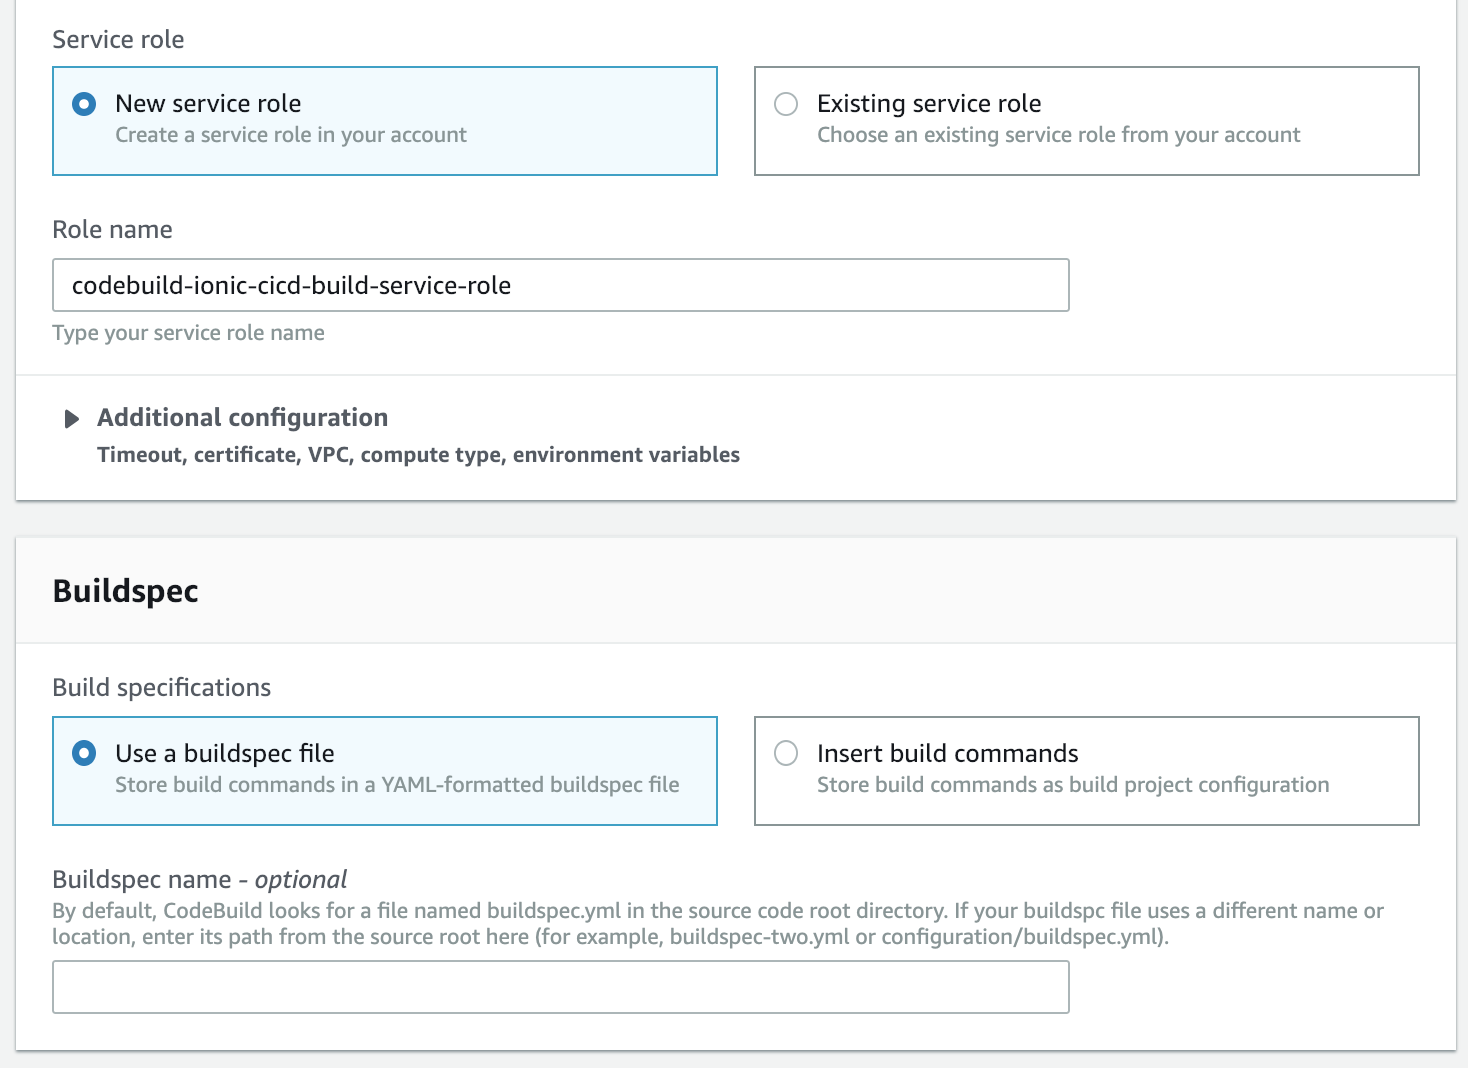
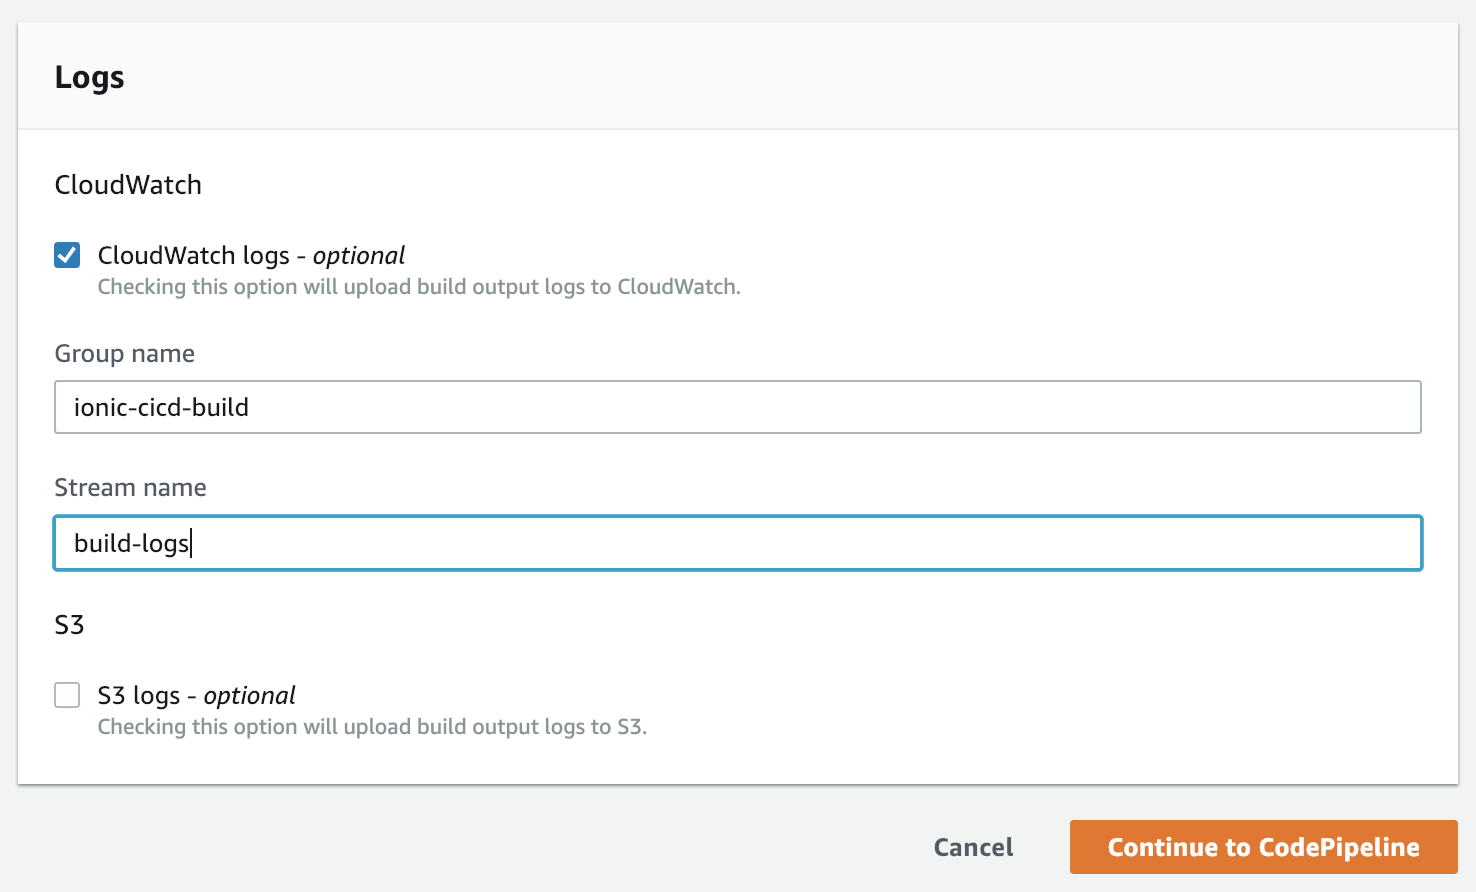
**If you want to log the build output - which I suggest you do but is not required - go ahead and fill out CloudWatch specifics (the correct CloudWatch policies will NOT automatically be added to the related service role. You'll need to add those yourself).
 Remember to add the policies later
When you're all done, click Continue to CodePipeline. Your CodeBuild project should now be selected.
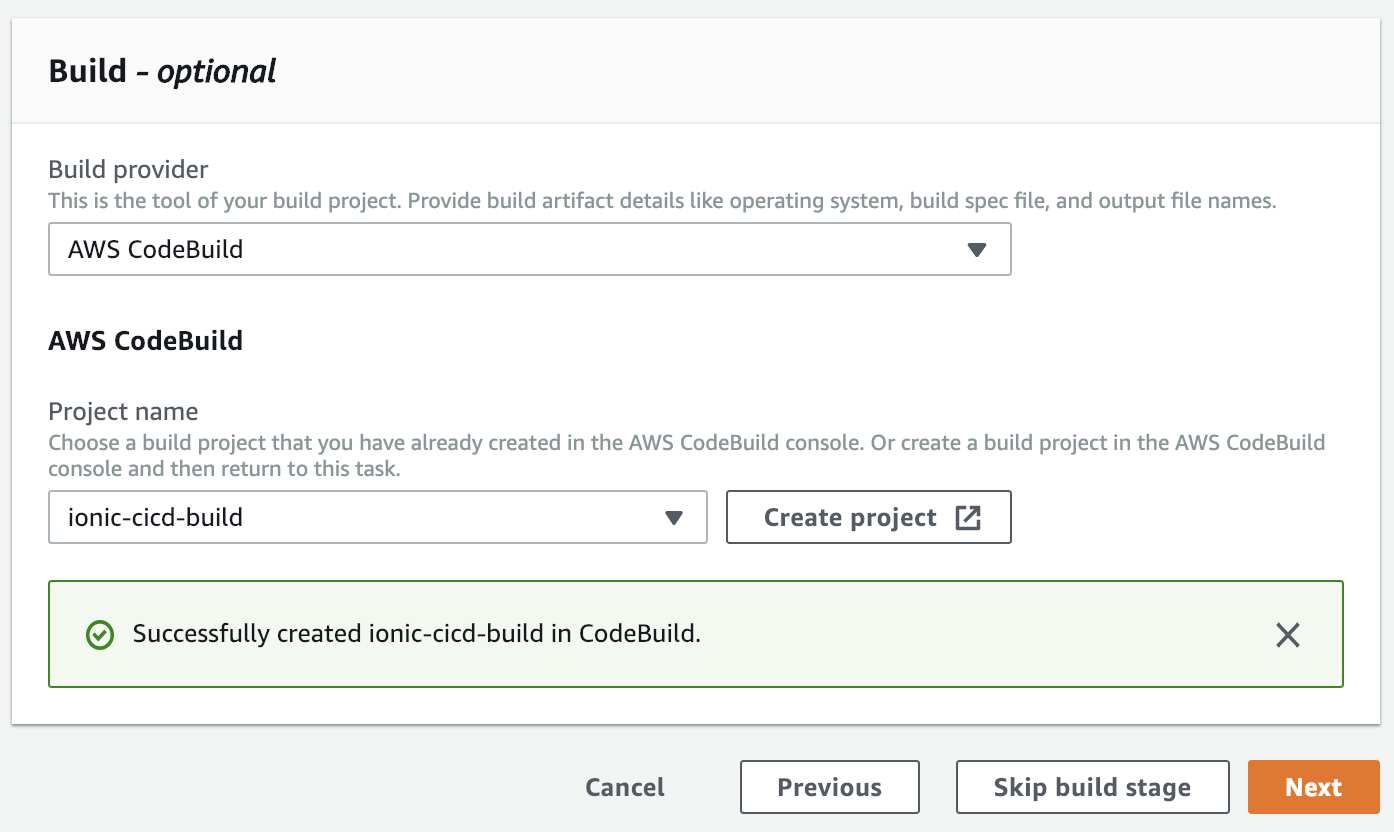 Confirm your newly created CodeBuild project
The next step you will select an S3 bucket to deploy your files to. However, that screen doesn't give you the option to create the bucket the same way we got to create a CodeBuild project on the fly. So go ahead and open a new tab for the AWS S3 Console and create a bucket over there.
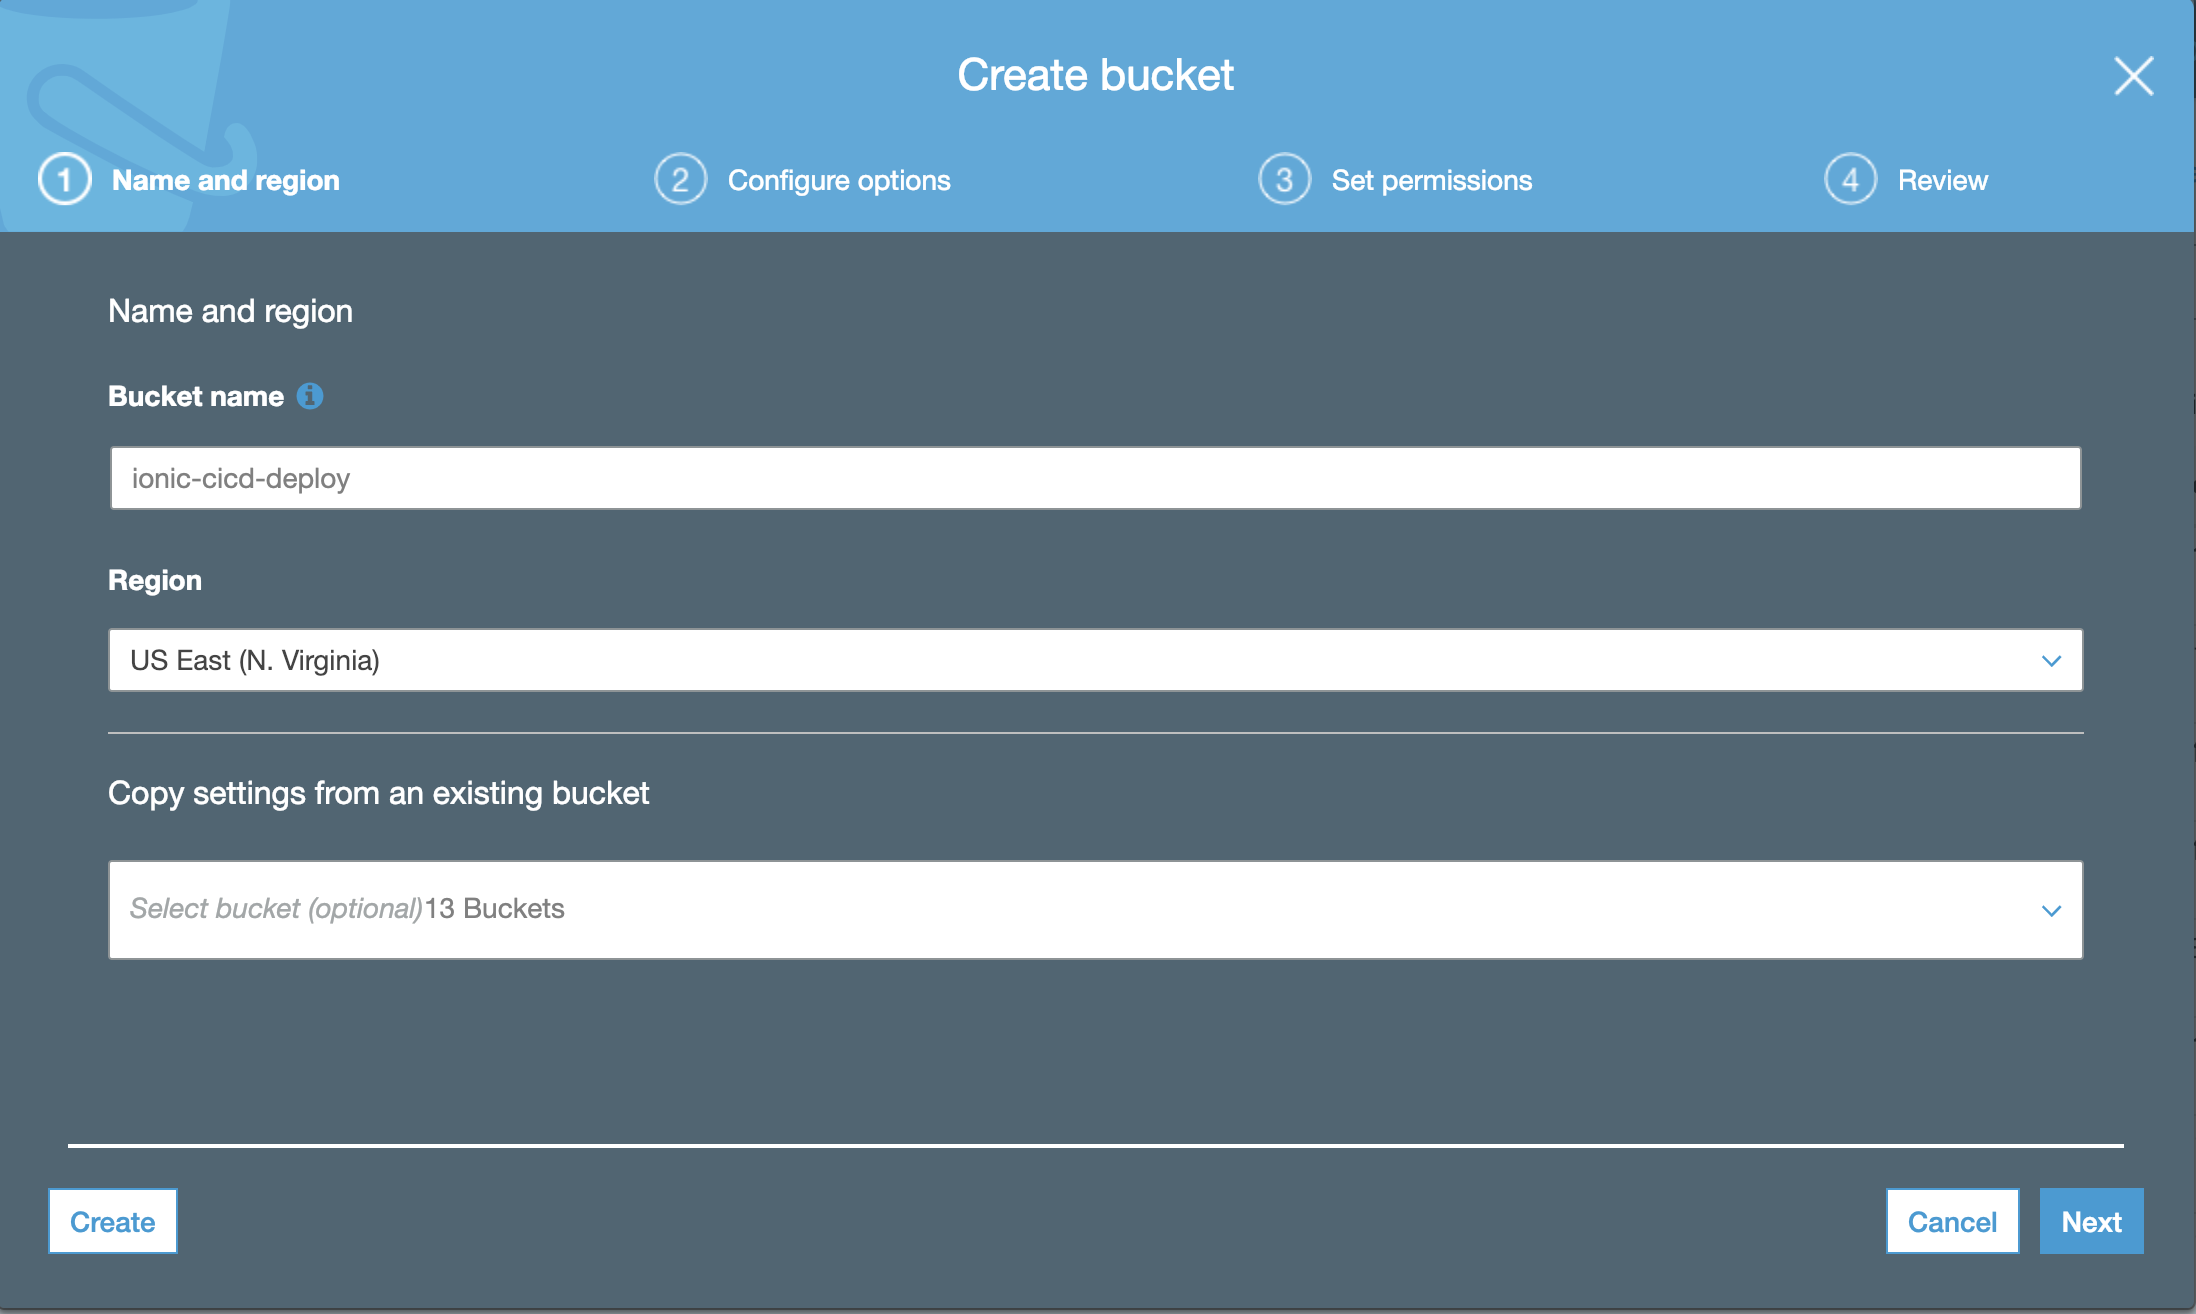 Bucket time!
You can accept all defaults if you want, the bucket does not need to be, and shouldn't be, public.
Review and Create the bucket. Now go back to your other tab, where you have setup the CodeBuild project in CodePipeline and hit Next.
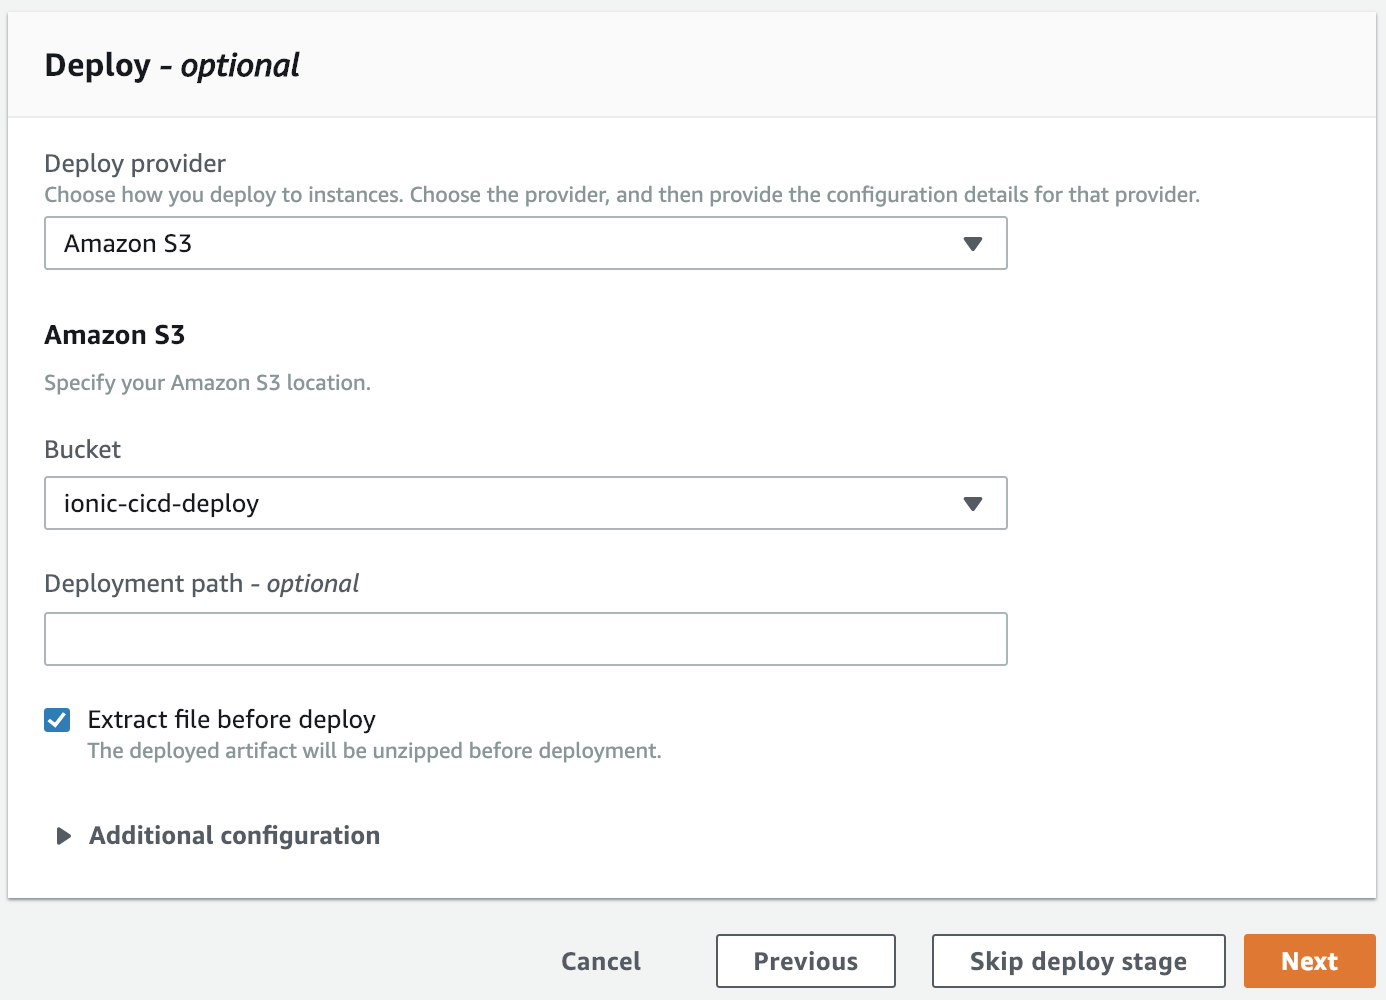 Pick your bucket
Pick your bucket and make sure you pick to 'Extract file before deploy'. Hit Next.
Review all your settings one last time and then hit Create Pipeline:
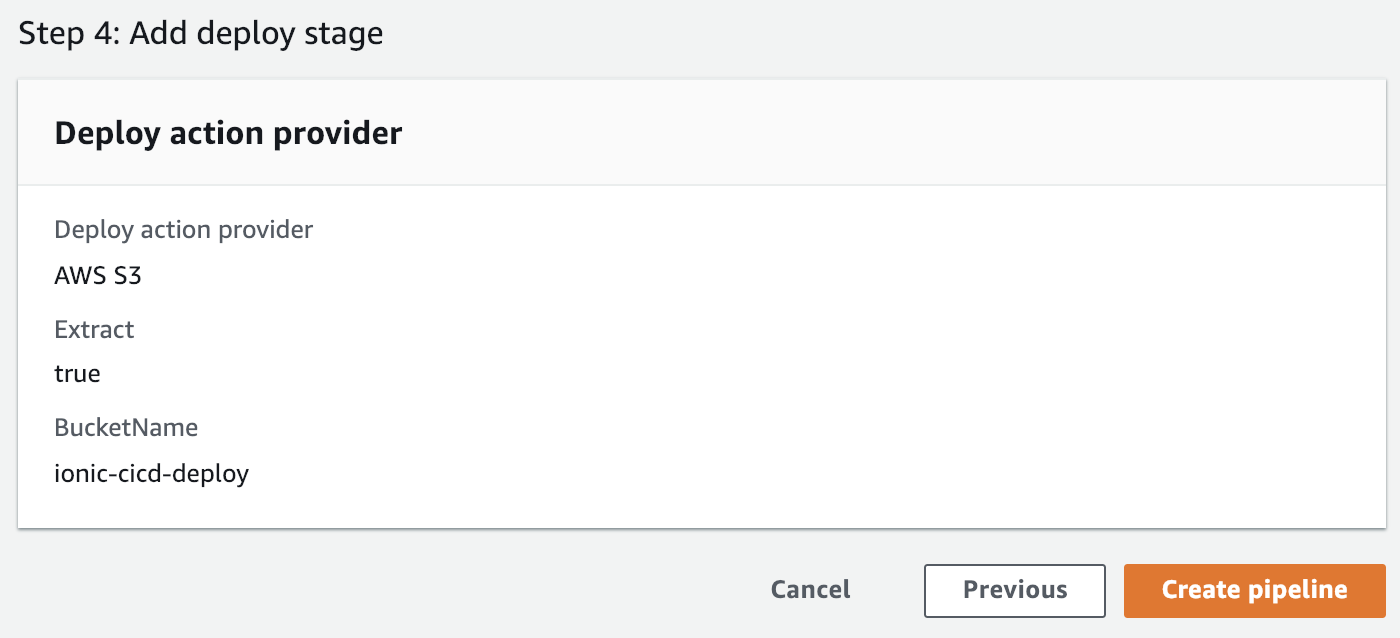 Review and Create the CodePipeline!
Once created, CodePipeline will automatically run the first build. No need to push anything to the repository.
Now, if you picked to log your CodeBuild project but didn't remember to setup the permissions manually, or didn't get to it quick enough, you're going to see an error:
ACCESS_DENIED: Service role arn:aws:iam::XXXXXX:role/service-role/codebuild-ionic-cicd-build-service-role does not allow AWS CodeBuild to create Amazon CloudWatch Logs log streams for build arn:aws:codebuild:us-east-1:XXXXXX:build/ionic-cicd-build:ABCDEF....
Even though AWS setup the service role for you, it did not give it permissions to write CloudWatch logs. Read here if you are unsure how to do this. For my testing, I just attached the CloudWatchAgentServerPolicy to my service role.
You should see a completed CodePipeline like this:
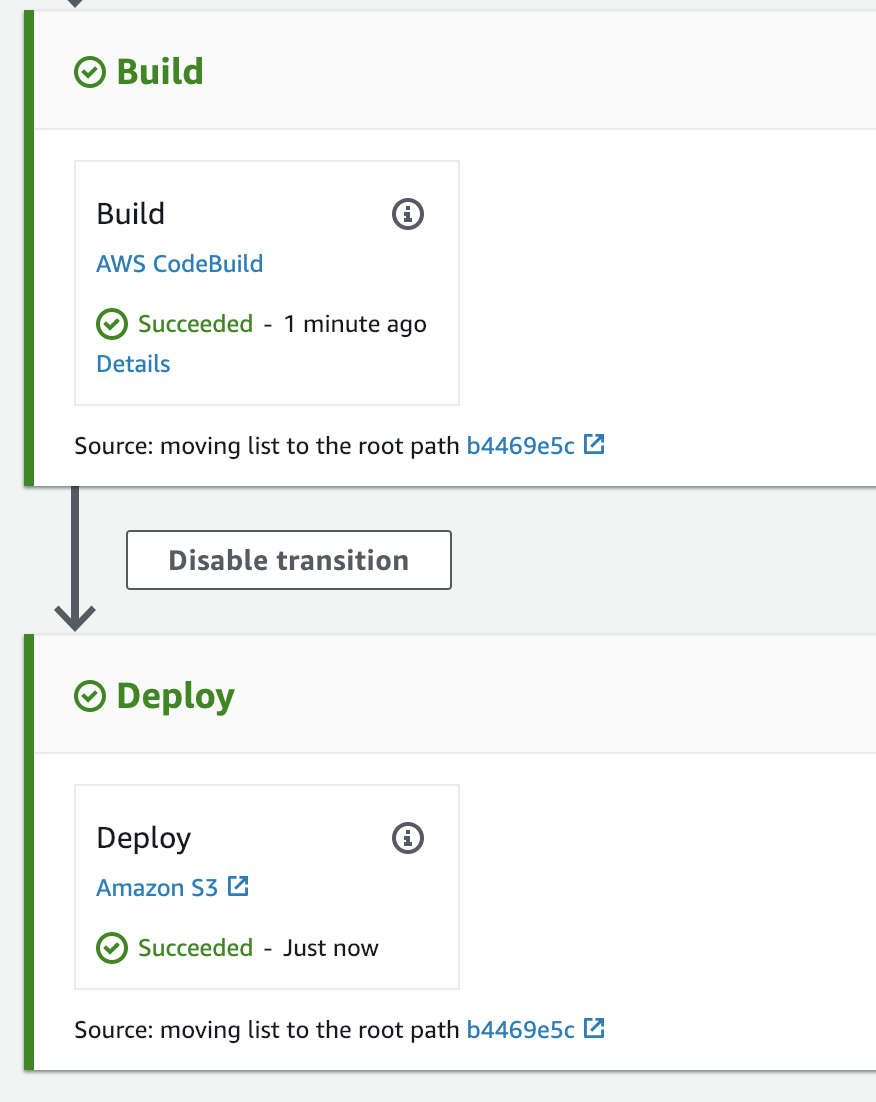 First run of the build!
And if you check your S3 bucket, you should see files similar to this:
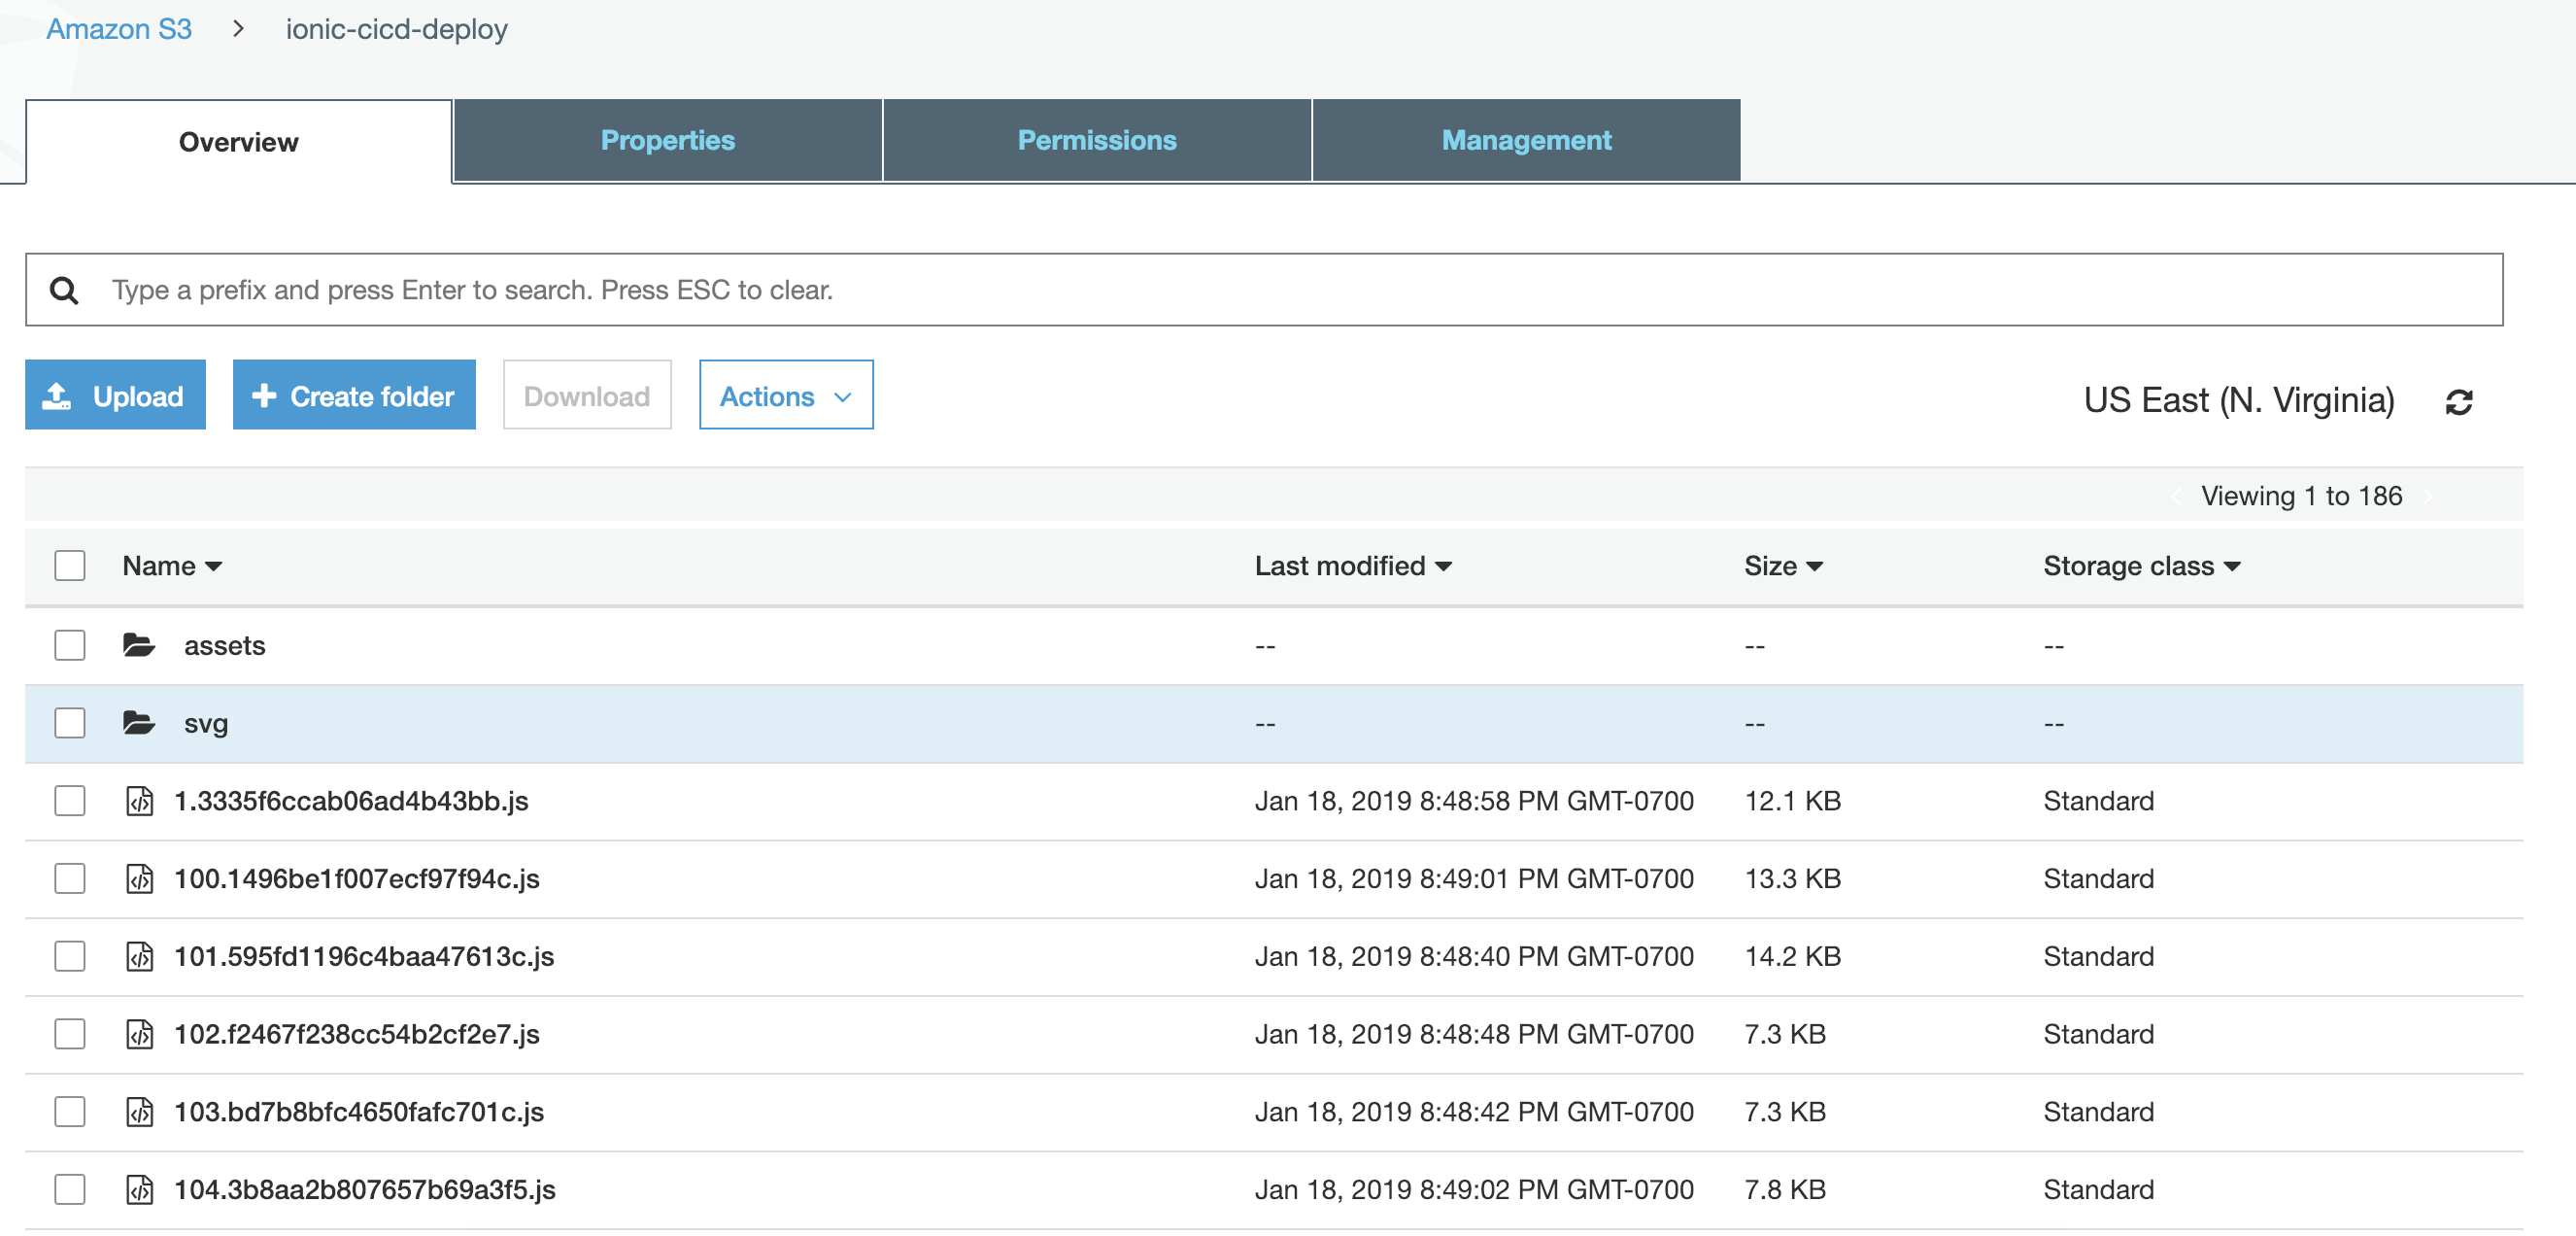 Look at those glorious files!
Great! We're almost done. Now we just need a CloudFront distribution in front of this. Now, I know what you're wondering:
"But can't I just use S3 Static Website Hosting" - me, at the start of this
You'd think, and if you didn't care about SSL, you probably could. However, any good website should have SSL and CloudFront also solves a few issues around routing for us, so let's continue...
Start creating a new Web distribution in the CloudFront Console:
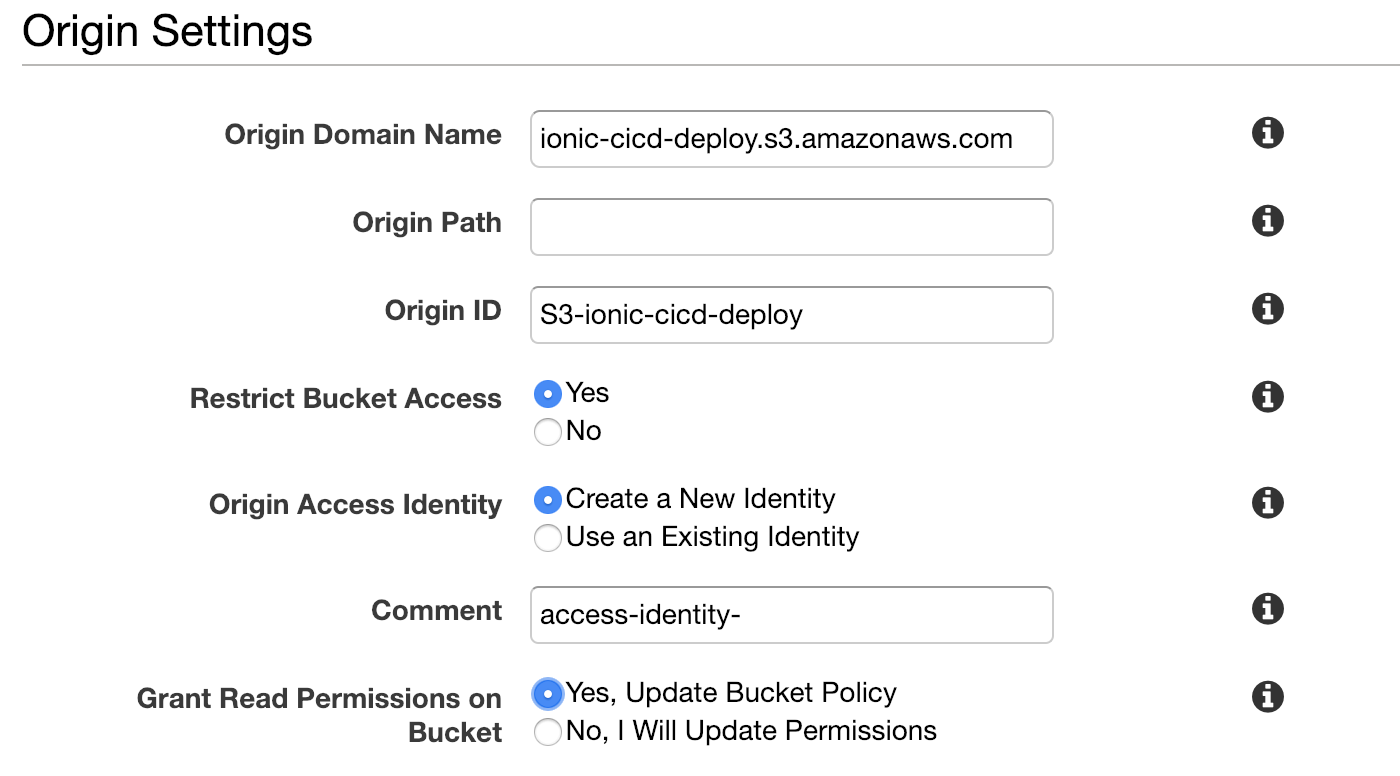 Pick your bucket, and setup access
Pick your S3 bucket as the origin domain name. We want to restrict bucket access, so that we don't have to make our S3 bucket public. Let CloudFront take care of granting the permissions in the bucket policy. The only other default you should have to change is the Default Root Object near the bottom, set that to "index.html".
I'm not going to setup a CNAME alternative for this (for custom domain names) but you probably will want to, so read up on it here. When you're satisfied, go ahead and create the distribution.
It'll take a few minutes, but once complete you should be able to load the site at the Domain Name CloudFront generated for your distribution.
And that's generally it. You should now have a functioning website based on the Ionic starter template. Any updates you push to your repository will be deployed out after a few minutes of the CICD process running. However, since we're using CloudFront, the cache will still show the old files. That's not good. You COULD let the cache naturally expire, or invalidate it yourself, but one requires waiting FAR too long to see the new code, and the other is manual. Both are gross.
We need a way to tell CloudFront to invalidate the files after they've been redeployed to S3. So, let's take a look at our options. If we go into editing the CodePipeline, let's take a look at what kind of actions we can take after the S3 push:
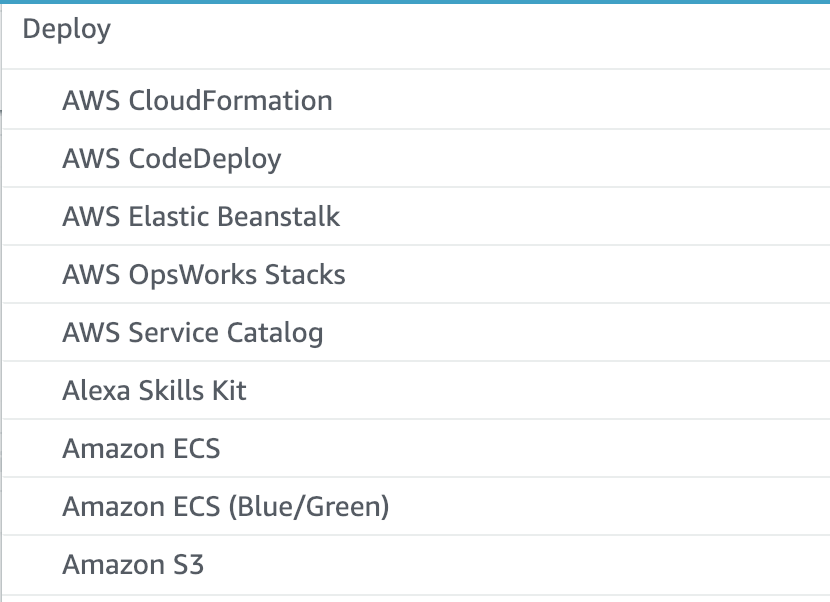 I don't see anything that says CloudFront
Hmm, so nothing regarding CloudFront, bummer. What else we got?
 Lambda to the rescue!
Ah ha, Lambda! The Swiss Army Knife of AWS. Since we can call a Lambda we can easily create one that will invalidate the CloudFront cache:
const AWS = require('aws-sdk');
const cloudfront = new AWS.CloudFront();

exports.handler = async(event) => {
    // Extract the Job ID
    console.log('event:', event);
    const job_id = event['CodePipeline.job']['id'];

    // Extract the Job Data
    const job_data = event['CodePipeline.job']['data'];
    console.log('job_data:', job_data);
    const distribution_id = job_data.actionConfiguration.configuration.UserParameters;

    console.log('invalidating distribution:', distribution_id);
    await cloudfront.createInvalidation({
        DistributionId: distribution_id,
        InvalidationBatch: {
            CallerReference: `invalidate-after-s3-${new Date().getTime()}`,
            Paths: {
                Quantity: 1,
                Items: ['/*']
            }
        }
    }).promise();

    var codepipeline = new AWS.CodePipeline();
    await codepipeline.putJobSuccessResult({
        jobId: job_id
    }).promise();

    return {
        statusCode: 200,
        body: ''
    };
};
I'm not going to cover all the steps in creating this Lambda. Just don't forget to give it an execution role that Allows the cloudfront:CreateInvalidation and codepipeline:PutJobSuccessResult Actions. Let's go ahead and setup a new Action Group on the Deploy stage of our CodePipeline and add the Lambda:
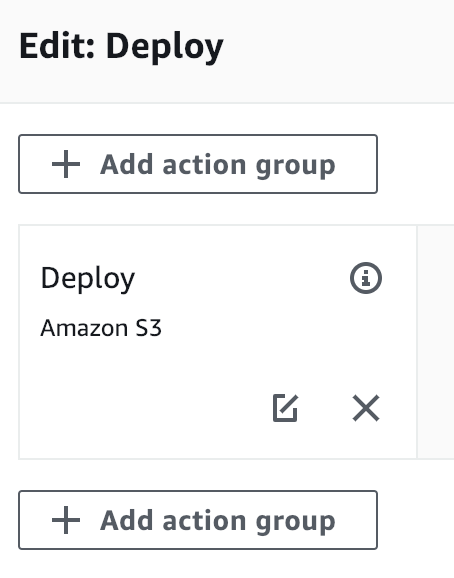 Add a new action group below the S3 deploy
For the UserParameter, pass the CloudFront Distribution ID you find over in the CloudFront console.
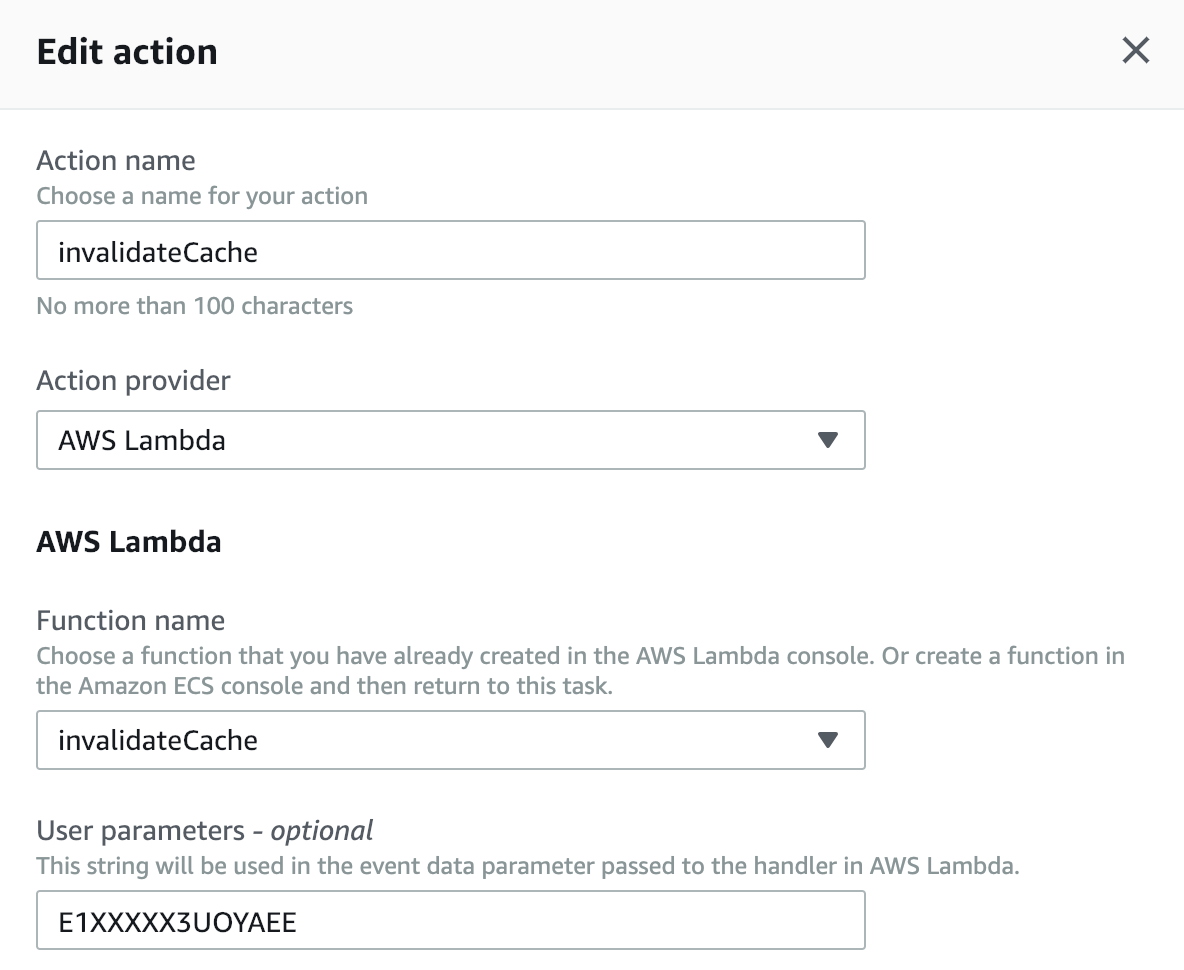 Add the invalidate action
Alright, now if you Release the CodePipeline, you should see the S3 files get deployed and then our CloudFront cache is invalidated.
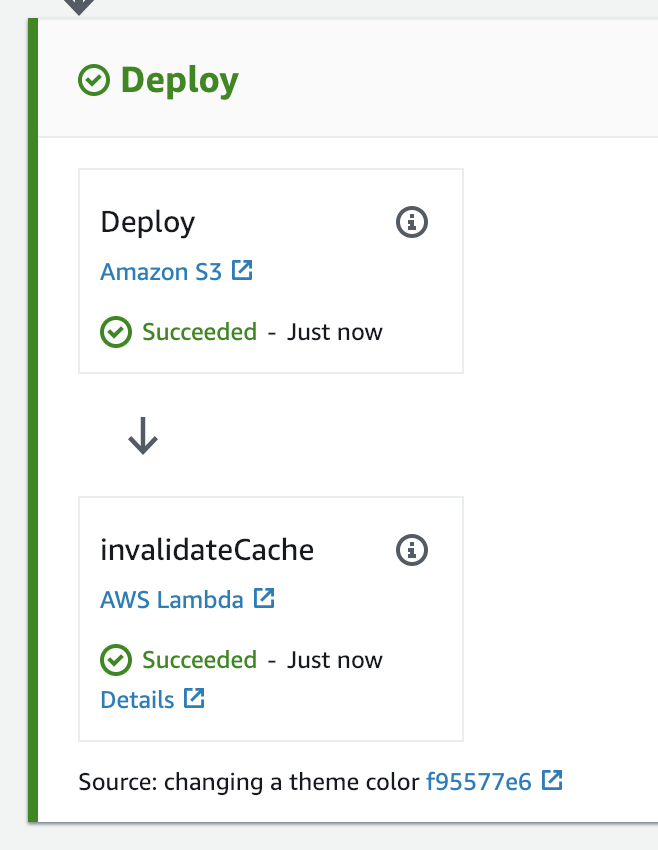 Deploy + Invalidate
You should see a related record in the CloudFront Console:
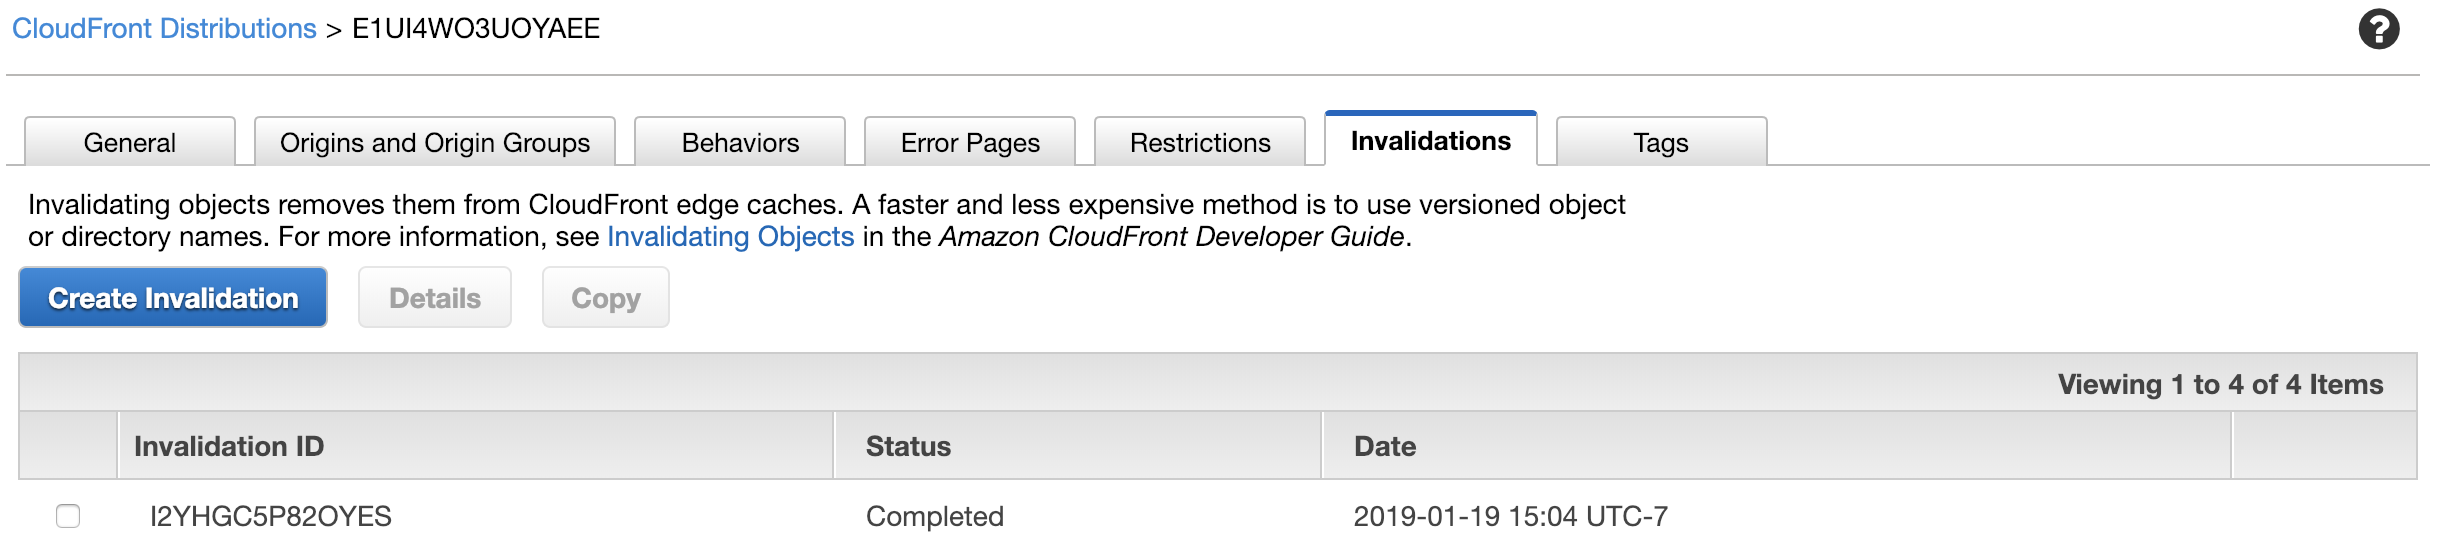 Invalidated!
Great! Now we have this fully deployable application when we do a git push to 'master'. Try it out now, change something significant (and obvious) in your Ionic project and then push to your repository.
 CICD!
CICD!
As you can imagine, this process would work with any static website, since nothing we did here was specific to Ionic 4, other than our buildspec.yml file and some config when we setup the CodeBuild project.
**Now, as you probably noticed, this was likely a little more than 5 minutes. I think if you knew the process and weren't following the guide, 5 minutes could be enough time. So, yes, "5 minutes" was clickbait in my title. Sue me. But, since that's still too long and I now have guilt, I created a Terraform module you can use to create all of this in just a minute. Check it out here:
https://github.com/mbonig/simple-aws-cicd